Skirt Full of Stars by Shannon Henry, Polymath Design Lab
Imagine a skirt that sparkles with a rainbow of colors as you walk, dance, and twirl.
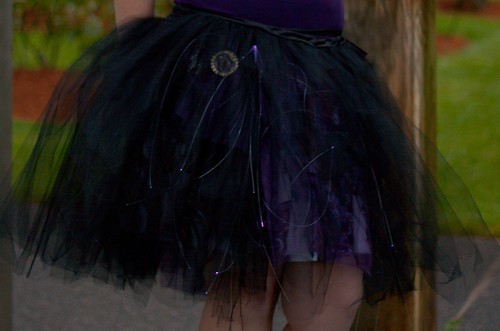
The Skirt Full of Stars is an interactive, illuminated garment using the LilyPad Arduino platform, designed to respond to and accentuate the movements of its wearer.
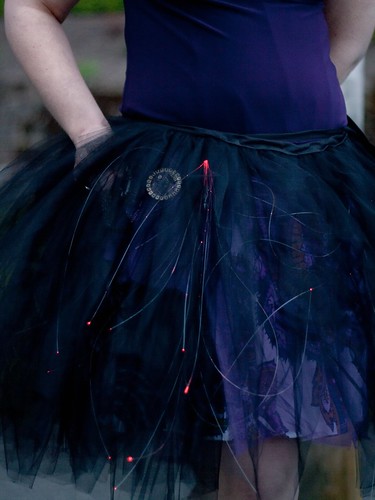
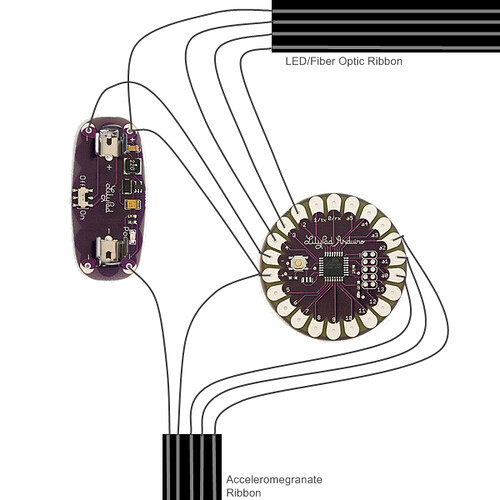
The LilyPad mainboard and power supply are sewn to a purple organza underlayer on a black tulle skirt, with an accelerometer hanging from a ribbon below. The LilyPad translates the movement readings from the accelerometer to colors using tricolor LEDs in the waistband, and sparkling fiber optics are woven through the tulle to disperse the light and create twinkling, color changing stars.
Tutorial: Make your own Skirt Full of Stars!
Update:
Due to tremendous interest at Maker Faire Bay Area 2010, I’m now working to produce a kit to make your own Skirt Full of Stars. If you’d like to be updated on kit availability, please sign up for email notification!
Materials needed
- 10 yards black tulle
- 1 yard purple organza or similar sheer fabric
- 2 in. scrap of non-fraying fabric such as leather or felt in a coordinating color
- 1-2 yards black grosgrain ribbon
- Black wide double-fold bias tape
- Conductive thread
- Heavy duty black thread
- 6 RGB LEDs – common cathode
- 1 Lilypad Arduino mainboard
- 1 Lilypad power supply
- 1 Lilypad accelerometer
- 6 in. of 3/16″ heat shrink tubing
- About 200 ft. of fiber optic strands
- Fray-check or washable fabric glue
- Clear silicone-based glue
- Black fabric paint
Tools:
- Needle-nosed pliers
- Wire cutters
- Heat gun
- FTDI connector for programming the Lilypad board
- Computer with Arduino software
Hints and tips:
- When working with conductive thread, I seal every thread end with a tiny dab of fabric glue to avoid fraying. I use the tip of a pin to apply a tiny dot of glue to the thread, then cut through the glue so both ends will be sealed.
- For the heat shrink tubing, I use a cheap heat gun I picked up for rubber stamp embossing eons ago. I’ve heard of people using matches or lighters for heat shrink, but if you plan to try something like that I’d highly recommend making a test connection first – especially since both the LED and fiber optics being joined are plastic!
Prepare the LEDs:
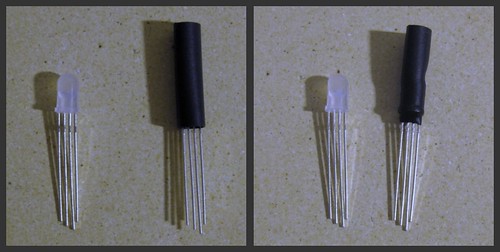
- Cut six 1″ lengths of heat shrink tubing. Place a length of tubing on each LED so that one end extends just a bit past the flat end.
- Carefully shrink the tubing around the LED while keeping the other end open – this is where the fiber optic strands will be attached later.
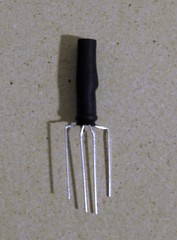
- Using needle-nosed pliers, bend the legs of the LEDs to create more space between them – see photo below.
Create the ribbon cables:
I used grosgrain ribbon to create literal ‘ribbon cables’ to attach the LEDs around the waistband of the skirt and to allow the accelerometer to hang for more freedom of movement.
For the LEDs you will need a length of ribbon a few inches shorter than your waist measurement at the point where you’d like the skirt to sit. You will also need a 4-6″ length of ribbon for the accelerometer.
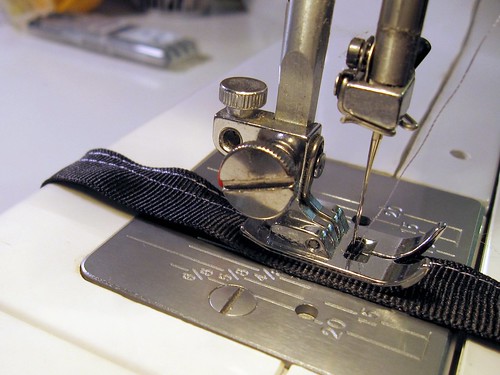
- Load your sewing machine bobbin with conductive thread, and normal thread on top. I used a contrasting color here, but you may want to pick a matching thread.
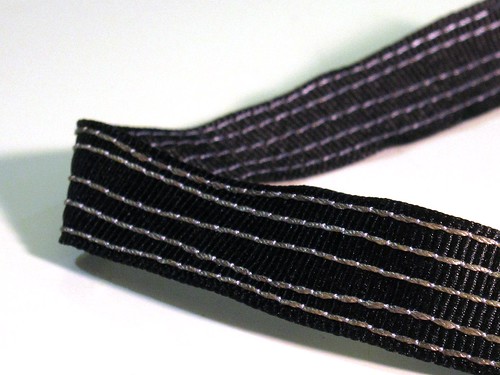
- Sew four parallel lines of conductive thread on the long ribbon, keeping the all of the conductive thread on the same side. I like to leave long tails – around 12″ – to allow me to hand sew the ribbon to other components without needing to splice the thread.
- Sew five parallel traces on the shorter ribbon, again keeping all of the conductive thread on the same side.
Note: You can also create a ribbon cable by hand sewing the parallel traces onto the ribbon, though it is much slower. Also, if the traces are hand sewn, there will be conductive thread on both sides of the ribbon, so an additional insulating layer of fabric or ribbon will be needed when you attach the LEDs.
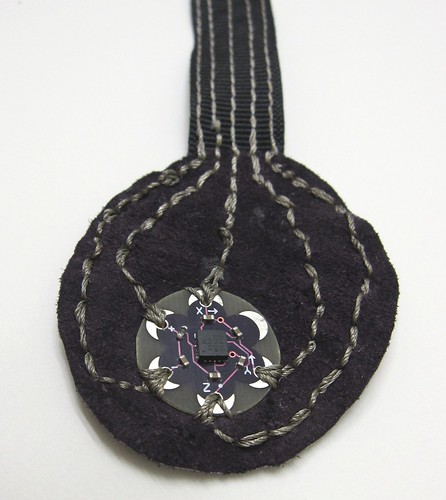
Make the acceleromegranate:
Creating a freely hanging attachment for the accelerometer allows it to move more in each direction, making for a more interesting play of colors. I used some reclaimed purple suede I had left from another project, and the purple circle with the curved lines of stitching ended up reminding me of a pomegranate, so I dubbed this component the acceleromegranate.
- Cut a circle around 2″ across from a non-fraying fabric – the lilypad mainboard is a great size to trace for this.
- Place your lilypad accelerometer towards the bottom of the circle so that the arrow printed for Y is pointed away from you. Use a pen to lightly mark the holes and petal edges on your fabric.
- Line up your short ribbon cable so that it connects at the top of the circle and points away from you (parallel with the arrow printed for Y). Tack the end of the ribbon to the edge of the circle with normal thread.
- Sew the traces on the ribbon to the connection petals on the accelerometer, in the following order (left to right): -, +, X, Y, Z. If you left long thread ends when creating your ribbon cable, you can simply use those to sew the connection. If your thread tails are too short for that, take care not to let the knots on different traces touch where you connect to the ribbon cable.
Make the LED ribbon:
- Mark the points on your long ribbon where you will attach the LEDs. To distribute them evenly, divide the length of your ribbon by 6 to determine the distance between LEDs. Place the first LED half that distance from the end of the ribbon.
- Place your first LED on the side of the ribbon with normal thread, so that the cathode (longest leg) is the lead second from the right. The ribbon serves as your insulation – make sure you aren’t placing the LED directly against the conductive traces.
- Use conductive thread to sew the cathode to the conductive thread trace on the ribbon that is furthest from the lens of the LED, making sure that your thread is crossing the trace on the ribbon to make a good connection. Tie off the thread and clip the ends close so that they don’t touch any other leads.
- Use needle-nosed pliers to bend the cathode back over your stitching and wire cutters to cut the lead.
- Use the same process to stitch each LED lead to a different trace on the ribbon – the left lead to the bottom trace, the second lead to the second trace, and the right lead to the third.
- Sew the rest of the LEDs to the ribbon, checking as you go that they are all oriented in the same direction.
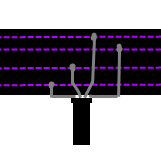
Sew the circuit:
- Cut a small panel of organza for the circuit – about 6″ wide. You can hem the edges if you like, cut them with pinking shears and leave them raw, or carefully flame them with a candle (my personal preference).
- See the diagram below for the circuit connections.
- Note that there is one point where the positive and negative traces cross. To keep the circuit from shorting, keep your negative trace thread on the back side of the organza at that point, add a small piece of fabric or ribbon to insulate, and keep the positive trace thread on top of the insulating layer.
Program the board:
- If you aren’t familiar with programming a lilypad, I’d suggest taking a look at Leah Buechley’s excellent materials on connecting the lilypad, setting up the arduino software, and programming a lilypad.
- Copy the code below into your Arduino software, make any necessary adjustments, and load it onto the board.
/* * Skirt Full of Stars * * Uses a LilyPad Arduino and accelerometer to control the color of RGB LEDs * Which are sewn into the waistband of a skirt with fiber optics * Tutorial available at http://StarSkirt.PolymathDesignLab.com * * Designed by Shannon Henry, Polymath Design Lab */ int sensorValueX; //variables to hold accelerometer data int sensorValueY; int sensorValueZ; int acceleroX = 0; //analogue petal that accelerometer X coord reading is tied to int acceleroY = 1; //analogue petal that accelerometer Y coord reading is tied to int acceleroZ = 2; //analogue petal that accelerometer Z coord reading is tied to int adjustedX; //variables to hold remapped values for color generation int adjustedY; int adjustedZ; int redTab = 4; //petal attached to red LED lead int blueTab = 2; //petal attached to blue LED lead int greenTab = 3; //petal attached to green LED lead void initializeRGB(void) { pinMode(redTab, OUTPUT); pinMode(blueTab, OUTPUT); pinMode(greenTab, OUTPUT); analogWrite(redTab, 0); analogWrite(blueTab, 0); analogWrite(greenTab, 0); } void setup() { Serial.begin(9600); //initialize the serial port so that you can communicate with the computer } void loop() { sensorValueX = analogRead(acceleroX); // read accelerometer data sensorValueY = analogRead(acceleroY); sensorValueZ = analogRead(acceleroZ); adjustedX = map(sensorValueX, 400, 650, 0, 255); //maps the sensor value onto the range 1-255 to correspond with color values adjustedY = map(sensorValueY, 400, 600, 0, 255); //To calibrate - uncomment serial.println code below, and adjustedZ = map(sensorValueZ, 430, 650, 0, 255); //adjust initial 2 values to reflect range of readings received when calibrating //Serial.println(adjustedX); // send the sensor data to the computer so you can calibrate RGB LED display //Serial.println(adjustedY); // //Serial.println(adjustedZ); // //Serial.println(); // comment out the Serial.println lines again once color calibration is complete delay(5); // very brief delay analogWrite(redTab, adjustedX); // display the color analogWrite(blueTab, adjustedY); analogWrite(greenTab, adjustedZ); } - Once you have the code loaded, the LEDs should light up and begin responding to movements of the accelerometer.
Attach the fiber optics:
You can get plastic fiber optic cable bundles online from sources for creating starfield ceilings. The skirt takes around 200 feet of fiber optic strands, which you can obtain in lots of different configurations. However, I highly recommend using a bundle with a high strand count – both because the cost per foot is cheaper that way, and because the protective outer sheathing is much easier to remove from the bigger bundles.
Over-heating the fiber optics can cause them to melt – so if you have some spare heat shrink tubing and LEDs, it can be good to practice the fiber optic attachment technique before trying it on LEDs that are already sewn to the ribbon. Just put together a bundle of short/scrap pieces of optical fiber, and use them to get a feel for how long you can heat the whole assembly before you should move the heat gun away.
- Carefully strip the sheathing off of your fiber optic bundle
- Use a hot knife or wire cutters to cut a variety of lengths of optical fibers, from about 6″ to about 2′ (or longer, if you like). If you have a hot knife, that’s the preferred method for cutting the fibers – but some light degradation is acceptable, so wire cutters will certainly do the job.
- Gather a bundle of cut fibers approximately 5mm across, aligning them so one end is flush
- Dispense a small amount of clear silicone adhesive onto the tip of an LED, in the heat shrink tubing – enough to cover the LED with a 1-2 mm thickness of adhesive.
- Insert the flush end of the fiber optic bundle into the heat shrink tubing, pushing the ends tight to the LED surface as much as possible.
- Use a heat gun to carefully shrink the tubing around the fiber optic bundle. Keep the heat gun moving – focusing the heat in one spot for too long can cause the fiber optics to melt.
Insulate:
With all these flexible materials, it can be easy for the conductive threads to end up touching as the fabric folds… plus, if left exposed to air the conductive thread will tarnish and become more resistive. To protect your skirt from both of these problems, it’s a good idea to insulate the traces with fabric paint.
- Test your electronic assembly to make sure everything is working correctly – fixes are much easier to make before insulating!
- Use either the nozzle of the fabric paint bottle or a paintbrush to apply a coating of fabric paint over all exposed conductive thread traces on the front side of the organza panel and LED ribbon. I do not apply fabric paint to the lilypad board connections themselves.
- You may wish to put a dot of fabric paint over the power indicator LED on the lilypad power supply as well – it’s very bright compared to the more subtle fiber optics. If you want a less permanent cover, cut a small piece of electrical tape.
- Allow the fabric paint to dry for the time specified on the label. This also provides time for the adhesive connecting the fiber optics to cure.
- When the fabric paint is dry, flip your circuit over and apply fabric paint to the exposed conductive thread on the back of the fabric and the LED leads on the LED ribbon. Allow all paint to dry fully before moving on to assembling the skirt.
Assemble the skirt:
I use the fact that the tulle comes folded in half on the bolt to my advantage to make a nice, full, double-layered skirt super easily! Because the skirt is so full, it works best if the wrap only overlaps by a few inches – to determine the waistband length of your skirt, add 3 inches to your waist measurement at the point where you’d like the skirt to sit.
- Cut organza to your desired hem length (I’m 5’9″, and my skirt was 21″ long) and waistband length. Again, you can choose to hem the edges, carefully flame them, or cut with pinking shears and leave them raw. If you will be hemming the edges, be sure to add seam allowances.
- Cut tulle to desired hem length
- Using heavy duty thread, make a long running stitch next to the crease along the entire 10 yards of tulle.
- Gather the tulle to the waistband length you calculated above
- Stack the skirt layers with the large piece of organza on the bottom, the circuit in the middle, and the tulle layer on top. Distribute the gathered tulle evenly along the length, and baste all three layers together.
- Fold the bias tape over the waistband, with an equal amount extending on either side of the skirt. Tack down or baste together if necessary.
- Sew entire length of bias tape together, including ends, to create both the finished waistband of the skirt and the ties. If you choose to machine sew this step, be careful not to bring your needle down on the metal leads on the LEDs.
- Distribute the fiber optics. Start by poking the individual strands through the weave of the lower layer of tulle, then disperse them in various directions. You can either continue to weave them through the lower tulle layer occasionally to hold them in place, or stitch them to it.
TA-DA!
Your skirt is ready – time to go out dancing!